
Hello folks ")
I have recently moved to a apartment good enough to install a little but decent home studio in its 2nd room. Since I am renting, I didn't wanna do anything problematic to the walls, nor anything, by respect for the owner and also because that's just normal.
So, glueing was out of the question, and out of the few techniques I tried, I wanted to share mine, and why not make it a little tutorial for anyone who has never tried that, including a few general elements of DIY room treatment as a reminder.
Also, the room is tiny, it's about 2,5m by 5 to 6m depending on how you count it because of the closet.
I am nowhere near a professional acoustician, so if I say something wrong, by all means correct me and I will be happy to update what I have written !
I always wished someone did a little tutorial like this, which would have probably motivated me in doing it as well, so I thought I should do it myself.
What you need
Monitors
If your room is shitty and tiny like mine, you have to think about which monitors you'll need. The problem with tiny rooms being the bass buildup at relatively high frequencies (the bigger the room, the lower the frequencies that are "clean" basically since a longer wavelength will be able to fit entirely), there is no need for big monitors. I used to use Yamaha Hs80m, and instead of having them follow me in the country I live in now, I decided to keep them at home for later, and buy new ones instead, because everyone told me its 8 inches woofers would produce too much bass for such a room. So I went for the Equator D5s, tinier and which have the hype and the reputation of having a good stereo image and generally speaking sounding pretty good for the price. I don't say you should buy them as well, I saw a lot of rokkit, NS10, whatever, users and I just happened to be interested in those.
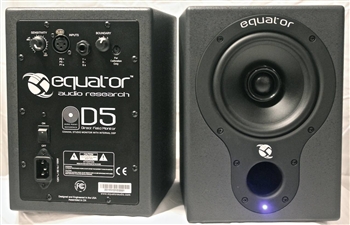
Also, from what people had said about their equator (and this could apply to many other models I suppose) is that if setup close to the listener, they sound very usable, and the closer to my ears the lesser the room impact will be.
Treatment
There are a few brands that offer kits, and I would also recommend if you are on a budget to consider the DIY way, but that was out of the question for me, for being far from home, not wanting to invest in tools, time, so I simply went the kit route. I decided not to be original, because at the same time you cannot really go wrong with them so I bought an Auralex kit. I bought this one :
http://www.thomann.de/fr/auralex_acoustics_roominators_alphadst_burgundy.htm
Because it has enough units for a room like mine, and includes 4 bass trap LENRD units, and bass being the problem in such a room, I couldn't not include them.
Now, later, I realized I should have taken 60x60 panels instead of 30x30. It would have saved me such a lot of time, but what can you do. So if you are, like me, renting and therefore not willing to leave a lot of marks on the walls, 60x60 panels will make your life easier ! I don't know if there is a kit like this available, but I could have done the exact same setup with say 10 to 12 60x60 panels, and 4 LENRD traps. Since no kit exists, it would have cost 100 to 150e more, as well.
Tools
Here is a picture of everything I used in my room

From top left to bottom right :
- Power tape
My initial idea was to create 60x60 panels to divide by 4 the number of marks I would have to leave on the walls, by using tape behind them. I realize it was a fiasco, because foam just doesn't stick long to tape, and got the idea of nailing them. But it will be useful later on anyway, I found another use for tis.
- Nails + Hammer
The hammer is actually the Ikea one, Ikea makes a shitty-but-good-enough kit which is like 10 euros and includes everything you need to build Ikea things (like my desk), and is all you need at home for day to day work.
The nails are actually the tiniest I could find, it says 0.9 x 25 mm. I suppose something as low as 0.75 mm could work. Less would just not stay solid when you hammer it I guess. The length is enough though. Whatever you find in this ballpark will be good. The idea is that with such tiny nails, if you just use a few ones in your room, when you remove them you just can't really find the holes again unless you are actively searching for them. I mean, on my walls, which are completely new and clean, any other mark like a little bubble of paint, or little scratch, is 50 times easier to spot. So I figured it's the best way to efficiently stick something to a wall without leaving a real mark.
- Sowing kit
Yes, my second idea, since the tape didn't work, was to simply sow panels together, and nail them to the walls. You need the classic thing, with just one precision : don't take very thin string, it was already difficult with those I used to make them sit tight, so take something a little too big far what you would use for clothes, I actually think a relatively thick string would have helped me way more than the one I bought.
- Pins
This will be used for panels you wanna stick to plastic/wood if you have the opportunity. This was the case for me since the back of my room is actually a wooden closet, I will show you what is the use of those pins later on. Take pins with this little bubble, or whatever that is not a straight pin like a nail. These are pins for shirts, kinda those you have to remove from brand new shirts displayed on a cardboard panel if you are following me.
- A meter
Just for general help aligning stuff
The Plan

First, as general rules dictate, you must create a perpendicular triangle with you and your monitors being the 3 tips. In my case I had something like 85cm per side, which I decided after roughly positioning my monitors depending on how I sit on my chair. Normally your spot is supposed to be approximately 1/3 (0.38 times the length IIRC) inside your room, which I didn't do because it is more practical for me to have a wall behind my desk, and i would be kinda close to that spot anyway considering how tiny the room is in the first place and how deep is my desk. But that's worth considering.
If you really want to enter details, I suggest reading more about this, there are a few very good guides, because my little guide is not about being very very accurate. Here are a few good links :
http://www.gearslutz.com/board/stud...tics-treatment-reference-guide-look-here.html
http://www.ethanwiner.com/acoustics.html
Basically you wanna absorb as much as possible of the indirect path of the sound, at least its primary reflections, which are the direct mirror paths from the monitors, to your ear, after bouncing the walls.
Ask a friend to use a mirror on the walls, to find the spot where the monitors are visible from your listening position. Mark it. Don't forget to do it for the other monitor, and this, for both walls. You end up with 4 marks.
Now normally, in a tiny room with monitors so close to each other, those spots must be close to each other, so you can just treat it like there is one per wall.
That's where you wanna put absorbers, heavily.
I could have noted as well that you wanna put absorber behind your monitors, and technically you should put diffusors behind you on the wall on the back, but I just decided to put whatever would be left there, and see later if I want improvement.
On the walls, further behind me, I would put a few panels, just to generally make the room a little more dead sounding than reverberating crap like mine (it has like a ringing frequency in the high range, when I clap my hands, for example), and also to create some kind of usable position where to record vocals with a closer-to-dead-wall-than-an-untreated-wall.
As usual, bass trap in the corners. I will have to be creative as you will see, so be creative yourself if the room doesn't allow for easy solutions !
My Method
- Sow panels together... It takes a lot of experiments, and I finally ended up building a technique that would be fast and tight enough for me. It is an art to sow panels together as tight as possible while being able to finish with a knot, and that's why I suggested not using thin strings, for they are very slippery in the hands, and not strong enough to hold panels together.
The tighter and the more complicated you sow them together, the stronger it will be, but also the longer it will take. I actually had a few panels fall on the ground while writing this guide, a few hours after nailing them on the wall, because the strings didn't survive, and had to correct a few things. Once it's stabilize, it's good to go.
i suggest considering the weight of the panels to decided where to sow them together. I found out sowing at 3 points per string per liaison between 2 little panels was enough for me. That makes 12 points to consolidate, with 4 strings per 60x60 bloc (there are 4 liaisons between 30x30 panels inside a 60x60 panel, side by side, and I sowed once per liaison with one string, going back and forth 3 times).
This took me a full afternoon and evening !
For the panels right on the right and left of the listening position, where the reflexion is the strongest, I created a 8x2 panel, so a 120x60 panel, to place vertically. It needs tighter sowing since the strings will have to carry twice the weight, for the top ones. Also, behind the monitors, I did 2 90x60 panels positioned horizontally, that I will show later on. This is totally dependent on my own place because it fits my windows perfectly, and you should feel free to be creative yourself if you are doing similar to me.
For the panels a bit further in the room, it's good to put them at the listening position, and if you have spare panels left, you can put some higher in the room if you want I guess.
- Nailing
Nail every panel with a single little nail. I personally hanged them from the top string that would be in the middle of the top 2 units of a 60x60 assembly, but it also works just hanging the foam right on the nail, piercing it. I actually did it on a few panels because it looked better than having loose strings, or felt stronger.
Here is what it looks like, this is the left 120x60 panel made of 8 little units :

Here is one of the sides :

You can see my microphone on the right, placed inside ta micscreen (precisely this one http://www.thomann.de/fr/the_tbone_micscreen.htm) and since the microphone is facing left, I stacked panels together on the Left wall so that it sounds a little more dead. It technically would come from the back of the singer, but that would be the earliest reflection the mic would get, along with the ceiling. So I kinda created an artificial vocal booth with a micscreen and a dead part of the wall. Far from perfect, but many have had decent results with less than that, so it's good enough for me ! I made this symmetrical by treating the right wall exactly the same. If I had more panels I would have created a 120x120 dead spot instead of those odd triangle shapes.

This is the listening position and the desk. Don't worry I will buy stands or create them myself Basically, I have put 90x60 panels INSIDE the window alcove, and they just sit there perfectly with no need to nail or glue anything. Also, the top par of the window are covered anyway as you can see, and it's nice to still be able to control how much light I want in the room. It's further up the wall anyway.
I have put 4 spare 30x30 panels behind them as well, just placed there against the wall. I also have 2 spare 30x30 panels that I use as DIY decouplers for my little orange micro terror amp to, I hope, save some bass decibels to my neighbors even though I don't play loud. It's also nice to have a few panels floating around if I want to be creative any day recording something I didn't plan.
- Bass traps
Someone asked on my other thread if I could come up with a nice way to hang bass traps without punching dozens of holes... Here is my solution, and it involves one single nail and a little physics trick !
Here is the nail :

Here is the bass trap :

Basically, if you put the nail on the top part of where will be the bass trap, and angle towards the ceiling, you can hook it up there. Since it's placed on its top, the moment (as in physics moment i.e. angular force) created by its weight towards the ground is gonna have it push against the wall anyway. Since it's well hooked and not too heavy, it just sits there super nicely, with a single very tiny nail. It's not literally glued to the ceiling, because its weigh and the fact it is made of foam make it fall a little, but still, it's pretty neat and clean.
- Sticking panels on plastic or wood surfaces
I found a good use for the tape and pins, to stick/glue panels where it is not a problem to, without using a strong glue. Here you go, a picture is worth an explanation :


As you see, since tape doesn't stick well to foam, I use the pins to pin it nicely, and use the tape to stick on the wall. It's easy and fast to do.
I basically put the few panels I had left in the back of my room, and to be able to open my closet again, I sticked them individually, with a little bit of repartition on the wall. If I had more of those it would be better but that's not the case. Technically that's where you would put diffusors in an orthodox setup.
I actually solved another panel problem using a similar technique. Instead of having to sow again one liaison that broke when I placed a panel, I used tape, pinned it on both sides of the liaison, and that was done. I don't know how strong it would be a whole panel, but it's a quicker fix that doing 5mn of sowing again.

Here it is again, you can see a bass trop on the top left corner. I put the right one INSIDE the closet, because I though that logic would dictate bass frequencies wouldn't care about the thin wood doors, and the bass trap would still be better left in the actual corner of the walls, inside. Also, it wouldn't be possible to put it outside, because I want to keep the door functional. If I'm wrong please tell me, that's what sounded logical to me but I could be wrong, since it could be true only for very low frequencies maybe, I don't know.
Finally
That's how it looks like in the end from the entrance

Excuse the mess, it's not yet completely setup
It is actually better in real world, the picture makes it look like the size of your bathroom while it's not that bad in real life ! You can notice my LENRD are not vertical, because the left one doesn't have space for that, so I put them horizontal instead.
So in the end, those are the best 1000e I ever spent. For the price of a single guitar, you can set up a decent sounding room with decent monitors. For even less for you american motherfuckers, since my monitors would be 300 bucks in the US instead of the double !
Now when I clap my hands, it's a little better sounding. Still not perfect, but I definitely hear an improvement. If I'm standing halfway in the room, facing to the side, I feel like my ear on the side of the monitors, where the treatment is the heaviest, feels like deaf compared to the right one.
The stereo image is soooo better than what I was used to until now. It's also much better than headphones. When I am well centered, I clearly hear center panned objects in front of me, including the bass, and I could locate objects panned left/right within say a few degrees of angle, maximum 5, because it is THAT precise. Panning something "35%R" now makes sense since I can hear the difference between 25 or 45% so well. Bass sounds rounder as well, I can notice lower frequencies in world class mixes, or electronic music. The equator d5 do a great job btw, I wouldn't expect so much bass coming from them. Voice feels like coming from in front of me, kicks have a bit more snap... it's definitely a worthwhile improvement. It doesn't mean I/you will be able to create better music right away indeed, but the simple fact music sounds better is already inspiring. And that cost me less that what I paid for my second hand ESP guitar ! And I didn't even go the cheap way, I bought a kit instead of DIY solutions, and new monitors. When I see the improvement it did, I can't imagine how does a fully designed room sound like, with high class monitors and stuff. And the most important for me : without glueing anything, and when one day I need to leave the apartment, all I need to do is to remove the panels, and the nails and I'm done in a few minutes. Also, I forgot to mention this, my panels are complementary in pairs, just like when you receive them in the box. I can put 2 60x60 panels inside each other to save space when I relocate, so that maybe I don't have to un-sow them. Another little trick !
That's all, hope it inspires some of you ! Cheers
I have recently moved to a apartment good enough to install a little but decent home studio in its 2nd room. Since I am renting, I didn't wanna do anything problematic to the walls, nor anything, by respect for the owner and also because that's just normal.
So, glueing was out of the question, and out of the few techniques I tried, I wanted to share mine, and why not make it a little tutorial for anyone who has never tried that, including a few general elements of DIY room treatment as a reminder.
Also, the room is tiny, it's about 2,5m by 5 to 6m depending on how you count it because of the closet.
I am nowhere near a professional acoustician, so if I say something wrong, by all means correct me and I will be happy to update what I have written !
I always wished someone did a little tutorial like this, which would have probably motivated me in doing it as well, so I thought I should do it myself.
What you need
Monitors
If your room is shitty and tiny like mine, you have to think about which monitors you'll need. The problem with tiny rooms being the bass buildup at relatively high frequencies (the bigger the room, the lower the frequencies that are "clean" basically since a longer wavelength will be able to fit entirely), there is no need for big monitors. I used to use Yamaha Hs80m, and instead of having them follow me in the country I live in now, I decided to keep them at home for later, and buy new ones instead, because everyone told me its 8 inches woofers would produce too much bass for such a room. So I went for the Equator D5s, tinier and which have the hype and the reputation of having a good stereo image and generally speaking sounding pretty good for the price. I don't say you should buy them as well, I saw a lot of rokkit, NS10, whatever, users and I just happened to be interested in those.
Also, from what people had said about their equator (and this could apply to many other models I suppose) is that if setup close to the listener, they sound very usable, and the closer to my ears the lesser the room impact will be.
Treatment
There are a few brands that offer kits, and I would also recommend if you are on a budget to consider the DIY way, but that was out of the question for me, for being far from home, not wanting to invest in tools, time, so I simply went the kit route. I decided not to be original, because at the same time you cannot really go wrong with them so I bought an Auralex kit. I bought this one :
http://www.thomann.de/fr/auralex_acoustics_roominators_alphadst_burgundy.htm
Because it has enough units for a room like mine, and includes 4 bass trap LENRD units, and bass being the problem in such a room, I couldn't not include them.
Now, later, I realized I should have taken 60x60 panels instead of 30x30. It would have saved me such a lot of time, but what can you do. So if you are, like me, renting and therefore not willing to leave a lot of marks on the walls, 60x60 panels will make your life easier ! I don't know if there is a kit like this available, but I could have done the exact same setup with say 10 to 12 60x60 panels, and 4 LENRD traps. Since no kit exists, it would have cost 100 to 150e more, as well.
Tools
Here is a picture of everything I used in my room

From top left to bottom right :
- Power tape
My initial idea was to create 60x60 panels to divide by 4 the number of marks I would have to leave on the walls, by using tape behind them. I realize it was a fiasco, because foam just doesn't stick long to tape, and got the idea of nailing them. But it will be useful later on anyway, I found another use for tis.
- Nails + Hammer
The hammer is actually the Ikea one, Ikea makes a shitty-but-good-enough kit which is like 10 euros and includes everything you need to build Ikea things (like my desk), and is all you need at home for day to day work.
The nails are actually the tiniest I could find, it says 0.9 x 25 mm. I suppose something as low as 0.75 mm could work. Less would just not stay solid when you hammer it I guess. The length is enough though. Whatever you find in this ballpark will be good. The idea is that with such tiny nails, if you just use a few ones in your room, when you remove them you just can't really find the holes again unless you are actively searching for them. I mean, on my walls, which are completely new and clean, any other mark like a little bubble of paint, or little scratch, is 50 times easier to spot. So I figured it's the best way to efficiently stick something to a wall without leaving a real mark.
- Sowing kit
Yes, my second idea, since the tape didn't work, was to simply sow panels together, and nail them to the walls. You need the classic thing, with just one precision : don't take very thin string, it was already difficult with those I used to make them sit tight, so take something a little too big far what you would use for clothes, I actually think a relatively thick string would have helped me way more than the one I bought.
- Pins
This will be used for panels you wanna stick to plastic/wood if you have the opportunity. This was the case for me since the back of my room is actually a wooden closet, I will show you what is the use of those pins later on. Take pins with this little bubble, or whatever that is not a straight pin like a nail. These are pins for shirts, kinda those you have to remove from brand new shirts displayed on a cardboard panel if you are following me.
- A meter
Just for general help aligning stuff
The Plan

First, as general rules dictate, you must create a perpendicular triangle with you and your monitors being the 3 tips. In my case I had something like 85cm per side, which I decided after roughly positioning my monitors depending on how I sit on my chair. Normally your spot is supposed to be approximately 1/3 (0.38 times the length IIRC) inside your room, which I didn't do because it is more practical for me to have a wall behind my desk, and i would be kinda close to that spot anyway considering how tiny the room is in the first place and how deep is my desk. But that's worth considering.
If you really want to enter details, I suggest reading more about this, there are a few very good guides, because my little guide is not about being very very accurate. Here are a few good links :
http://www.gearslutz.com/board/stud...tics-treatment-reference-guide-look-here.html
http://www.ethanwiner.com/acoustics.html
Basically you wanna absorb as much as possible of the indirect path of the sound, at least its primary reflections, which are the direct mirror paths from the monitors, to your ear, after bouncing the walls.
Ask a friend to use a mirror on the walls, to find the spot where the monitors are visible from your listening position. Mark it. Don't forget to do it for the other monitor, and this, for both walls. You end up with 4 marks.
Now normally, in a tiny room with monitors so close to each other, those spots must be close to each other, so you can just treat it like there is one per wall.
That's where you wanna put absorbers, heavily.
I could have noted as well that you wanna put absorber behind your monitors, and technically you should put diffusors behind you on the wall on the back, but I just decided to put whatever would be left there, and see later if I want improvement.
On the walls, further behind me, I would put a few panels, just to generally make the room a little more dead sounding than reverberating crap like mine (it has like a ringing frequency in the high range, when I clap my hands, for example), and also to create some kind of usable position where to record vocals with a closer-to-dead-wall-than-an-untreated-wall.
As usual, bass trap in the corners. I will have to be creative as you will see, so be creative yourself if the room doesn't allow for easy solutions !
My Method
- Sow panels together... It takes a lot of experiments, and I finally ended up building a technique that would be fast and tight enough for me. It is an art to sow panels together as tight as possible while being able to finish with a knot, and that's why I suggested not using thin strings, for they are very slippery in the hands, and not strong enough to hold panels together.
The tighter and the more complicated you sow them together, the stronger it will be, but also the longer it will take. I actually had a few panels fall on the ground while writing this guide, a few hours after nailing them on the wall, because the strings didn't survive, and had to correct a few things. Once it's stabilize, it's good to go.
i suggest considering the weight of the panels to decided where to sow them together. I found out sowing at 3 points per string per liaison between 2 little panels was enough for me. That makes 12 points to consolidate, with 4 strings per 60x60 bloc (there are 4 liaisons between 30x30 panels inside a 60x60 panel, side by side, and I sowed once per liaison with one string, going back and forth 3 times).
This took me a full afternoon and evening !
For the panels right on the right and left of the listening position, where the reflexion is the strongest, I created a 8x2 panel, so a 120x60 panel, to place vertically. It needs tighter sowing since the strings will have to carry twice the weight, for the top ones. Also, behind the monitors, I did 2 90x60 panels positioned horizontally, that I will show later on. This is totally dependent on my own place because it fits my windows perfectly, and you should feel free to be creative yourself if you are doing similar to me.
For the panels a bit further in the room, it's good to put them at the listening position, and if you have spare panels left, you can put some higher in the room if you want I guess.
- Nailing
Nail every panel with a single little nail. I personally hanged them from the top string that would be in the middle of the top 2 units of a 60x60 assembly, but it also works just hanging the foam right on the nail, piercing it. I actually did it on a few panels because it looked better than having loose strings, or felt stronger.
Here is what it looks like, this is the left 120x60 panel made of 8 little units :

Here is one of the sides :

You can see my microphone on the right, placed inside ta micscreen (precisely this one http://www.thomann.de/fr/the_tbone_micscreen.htm) and since the microphone is facing left, I stacked panels together on the Left wall so that it sounds a little more dead. It technically would come from the back of the singer, but that would be the earliest reflection the mic would get, along with the ceiling. So I kinda created an artificial vocal booth with a micscreen and a dead part of the wall. Far from perfect, but many have had decent results with less than that, so it's good enough for me ! I made this symmetrical by treating the right wall exactly the same. If I had more panels I would have created a 120x120 dead spot instead of those odd triangle shapes.

This is the listening position and the desk. Don't worry I will buy stands or create them myself
Basically, I have put 90x60 panels INSIDE the window alcove, and they just sit there perfectly with no need to nail or glue anything. Also, the top par of the window are covered anyway as you can see, and it's nice to still be able to control how much light I want in the room. It's further up the wall anyway.I have put 4 spare 30x30 panels behind them as well, just placed there against the wall. I also have 2 spare 30x30 panels that I use as DIY decouplers for my little orange micro terror amp to, I hope, save some bass decibels to my neighbors even though I don't play loud. It's also nice to have a few panels floating around if I want to be creative any day recording something I didn't plan.
- Bass traps
Someone asked on my other thread if I could come up with a nice way to hang bass traps without punching dozens of holes... Here is my solution, and it involves one single nail and a little physics trick !
Here is the nail :

Here is the bass trap :

Basically, if you put the nail on the top part of where will be the bass trap, and angle towards the ceiling, you can hook it up there. Since it's placed on its top, the moment (as in physics moment i.e. angular force) created by its weight towards the ground is gonna have it push against the wall anyway. Since it's well hooked and not too heavy, it just sits there super nicely, with a single very tiny nail. It's not literally glued to the ceiling, because its weigh and the fact it is made of foam make it fall a little, but still, it's pretty neat and clean.
- Sticking panels on plastic or wood surfaces
I found a good use for the tape and pins, to stick/glue panels where it is not a problem to, without using a strong glue. Here you go, a picture is worth an explanation :


As you see, since tape doesn't stick well to foam, I use the pins to pin it nicely, and use the tape to stick on the wall. It's easy and fast to do.
I basically put the few panels I had left in the back of my room, and to be able to open my closet again, I sticked them individually, with a little bit of repartition on the wall. If I had more of those it would be better but that's not the case. Technically that's where you would put diffusors in an orthodox setup.
I actually solved another panel problem using a similar technique. Instead of having to sow again one liaison that broke when I placed a panel, I used tape, pinned it on both sides of the liaison, and that was done. I don't know how strong it would be a whole panel, but it's a quicker fix that doing 5mn of sowing again.

Here it is again, you can see a bass trop on the top left corner. I put the right one INSIDE the closet, because I though that logic would dictate bass frequencies wouldn't care about the thin wood doors, and the bass trap would still be better left in the actual corner of the walls, inside. Also, it wouldn't be possible to put it outside, because I want to keep the door functional. If I'm wrong please tell me, that's what sounded logical to me but I could be wrong, since it could be true only for very low frequencies maybe, I don't know.
Finally
That's how it looks like in the end from the entrance

Excuse the mess, it's not yet completely setup
It is actually better in real world, the picture makes it look like the size of your bathroom while it's not that bad in real life ! You can notice my LENRD are not vertical, because the left one doesn't have space for that, so I put them horizontal instead.
So in the end, those are the best 1000e I ever spent. For the price of a single guitar, you can set up a decent sounding room with decent monitors. For even less for you american motherfuckers, since my monitors would be 300 bucks in the US instead of the double !
Now when I clap my hands, it's a little better sounding. Still not perfect, but I definitely hear an improvement. If I'm standing halfway in the room, facing to the side, I feel like my ear on the side of the monitors, where the treatment is the heaviest, feels like deaf compared to the right one.
The stereo image is soooo better than what I was used to until now. It's also much better than headphones. When I am well centered, I clearly hear center panned objects in front of me, including the bass, and I could locate objects panned left/right within say a few degrees of angle, maximum 5, because it is THAT precise. Panning something "35%R" now makes sense since I can hear the difference between 25 or 45% so well. Bass sounds rounder as well, I can notice lower frequencies in world class mixes, or electronic music. The equator d5 do a great job btw, I wouldn't expect so much bass coming from them. Voice feels like coming from in front of me, kicks have a bit more snap... it's definitely a worthwhile improvement. It doesn't mean I/you will be able to create better music right away indeed, but the simple fact music sounds better is already inspiring. And that cost me less that what I paid for my second hand ESP guitar ! And I didn't even go the cheap way, I bought a kit instead of DIY solutions, and new monitors. When I see the improvement it did, I can't imagine how does a fully designed room sound like, with high class monitors and stuff. And the most important for me : without glueing anything, and when one day I need to leave the apartment, all I need to do is to remove the panels, and the nails and I'm done in a few minutes. Also, I forgot to mention this, my panels are complementary in pairs, just like when you receive them in the box. I can put 2 60x60 panels inside each other to save space when I relocate, so that maybe I don't have to un-sow them. Another little trick !
That's all, hope it inspires some of you ! Cheers

 turn the gaffa towards the wall (as opposed as what I did, since it doesn't really glue anyway it's useless) and use a longer lengtht to glue directly to the plastic/wood surface. Cause otherwise, the weight of the panels is gonna unglue the gaffa because of the way it is setup (if you imagine yourself pulling the panel towards the ground, you'll easily feel it's easy to unstick). I found the panels on the ground after a day, but now that I changed for this updated trick it's perfectly attached.
 ), 4-2x4' broadband panels on the walls, and a 4x4' cloud above my desk, using 4" Roxul RHT80. Probably be cheaper if you used lower grade wood, but my design shows the wood on the outside (for aesthetics), so I used 3/4" birch ply.